You Make My Heart Beet – Smoothie Recipe

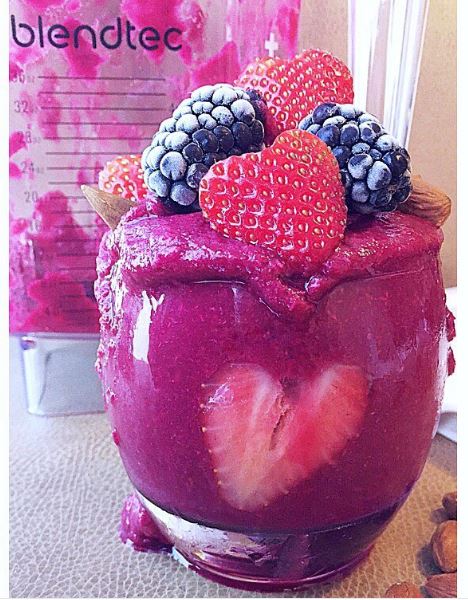
lunchesandlittles on Instagram has shared this delicious smoothie recipe called “You Make My Heart Beet” using her Blendtec to make it:

Today is all about L-O-V-E! And, a little later on I am going to show you how to make what my hubby and I have named our “You Make My Heart Beet” smoothie! Not only is it delicious and healthy, it is also pretty and bright-magenta-pink. ?

I know a lot of you are busy parents just like me, and trust me; I get it! … It can be really hard to keep up with a healthy routine when short on time for yourself, but if you love yourself, you need to take care of yourself too, and smoothies are a great way to get in tons of healthy fruits and vegetables in a snap. ???️ And, our @blendtec blender makes it is easier than ever! It’s so fast and easy to use and I love that it gets us eating better.

I will be sharing the step-by-step recipe for this perfect for Valentine’s Day smoothie shortly… Would you believe there are 3 vegetables and 4 different kinds of fruits packed into this thing, and that is it! ??? No extra sweeteners; nothing but real food!

Vegan Macaroni Cheese From LunchesAndLittles On Instagram

Lunches and Littles on Instagram 

lunchesandlittlesI’ve shared it before, and it’s always a hit, so as promised, here is the recipe for my Quick + Easy Vegan Macaroni and Cheese. This is a great go-to lunch, or dinner side that is both mom and #kidapproved!

WHAT YOU NEED:


? Your choice of pasta (about 2.5 – 3 cups), 1/2 cup raw cashews (soaked), 2 yellow potatoes, 2 carrots, a wedge of white onion, 2 cloves garlic, 1/4 cup coconut milk, 1 tsp garlic powder, onion powder and salt, and a pinch of paprika. Chives optional!
? *Make this dish gluten free, by choosing a gluten free pasta!

HOW YOU MAKE IT:


? Cook pasta like you normally would. While that is cooking start/ complete the steps below.
? Peel and chop potatoes into small pieces. Then boil potatoes for approximately 2 minutes.
? Peel and chop carrots and add to the boil. Boil for another 4-5 minutes.
? Add onion wedge (break it up a bit), and boil for another 5 minutes or until everything is pretty soft.
? Next, drain veggies, but don’t pour out the water you used to boil them. *You need it for the next step!
? Combine the (soaked) cashews, 1 and 1/4 cups of the water from the step above, all of the cooked veggies, garlic, and seasonings in your @blendtec blender (or other blender) and blend until smooth and creamy.
? Depending on consistency, add up to 1/4 cup of coconut milk to thin your sauce.
? Pour sauce over cooked pasta. And, viola! ? Season with salt and pepper to taste, and we top ours with chives; because I just love chives. ?

Rainbow Smoothie Pops

Rainbow Smoothie Pops

Baby Organic on Instagram posted this recipe for Rainbow Smoothie Pops on her feed, and kindly agreed to let us reproduce it here. These look absolutely delicious – here is her recipe below:

When asked for tips for picky eaters, I always talk about presentation. Kiddos eat with their eyes, and sometimes all it takes is a change in HOW food is presented for them to eat it right up! Perfect example: Rainbow Smoothie Pops!

WHAT YOU NEED:

  • Pink Layer: 1/4 cup frozen strawberries, 1/4 cup frozen raspberries, a few frozen cranberries (optional), 1/2 cup yogurt and 1/2 cup orange juice
  • Orange: 1/2 frozen banana, 1/4 cup yogurt, 1/2 cup frozen peaches, 2 carrots, 1 clementine
  • Yellow: 2 frozen bananas, 1/2 cup yogurt, 3/4 cup frozen pineapple
  • Green: 1 frozen banana, 1/2 cup yogurt, a handful of broccoli, 1/2 cup frozen pineapple, handful of spinach (optional)
  • Blue: 1/2 cup yogurt, 1/2 cup frozen blueberries, 1/2 cup frozen pineapple, small amount of blue food coloring (as needed to achieve desired color)
  • Purple: 1/2 frozen banana, 3/4 cup frozen mixed berries, 1/2 cup yogurt and a few beet slices

HOW YOU MAKE THEM:

  • For each layer, place ingredients into a blender (like a @blendtec!) and blend until smooth. Add more orange juice to help blend if mixture is too thick.
  • Continue blending each layer until you have 6 different colors of mixture (Be sure to rinse out your blender in between colors!).
  • Next, alternate pouring various layers into the molds, waiting about 2 minutes between each layer.
  • Once molds are full let them set completely (another few minutes). Remove pops from maker and enjoy!
  • If using a standard popsicle mold, use a spoon to scoop mixtures into the mold (Your layers will blend a little, but that is fine!) Once molds are filled, freeze overnight and enjoy next day!

* This recipe yielded about 12 pops. Adjust recipe according to your needs.